Scenes: Difference between revisions
| Line 42: | Line 42: | ||
Next to each object appears a lightning. It is yellow if there exists at least one action, otherwise it's grey. Clicking on the lightning opens a window which contains a list of all actions of this object. You can edit an action by selecting it, which will display the action at the bottom. Pressing on the icon 'plus' adds a new (empty) action. For further details see [[Actions]]. | Next to each object appears a lightning. It is yellow if there exists at least one action, otherwise it's grey. Clicking on the lightning opens a window which contains a list of all actions of this object. You can edit an action by selecting it, which will display the action at the bottom. Pressing on the icon 'plus' adds a new (empty) action. For further details see [[Actions]]. | ||
[[image: | [[image:Kulissen_Aktionen.jpg]] (TODO) | ||
===Place Graphics=== | ===Place Graphics=== | ||
Revision as of 12:30, 25 March 2006
General
This is a playable scene on which a character can move and act.
Tools
Edit way-borders
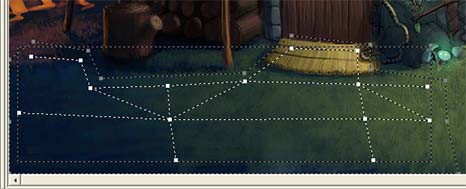
Here you can set the boundaries in which a character can move. You can create several polygons, but it is important that the edges of the polygons do not overlap each other (a polygon has to be at least a triangle). Furthermore all way points have to be inside a polygon. You can create a polygon by pressing the left mouse button; every additional left-click creates another boundary point which is connected to the previous one automatically. You can close a polygon by clicking on the start point again or by pressing the right mouse button. Pressing the Del key on your keyboard removes the most recent point again. To move a boundary point use the arrow keys on your keyboard or simply drag it with your mouse (press the left button and move it). To select an existing polygon click inside it but make sure you are not creating another one at the moment! A selected polygon is always be highlighted in red. Moving an entire polygon is similar to moving a single point of it: select the polygon as described above and drag it or use the arrow keys on the keyboard. To remove it press the del key.
Set and connect way-points
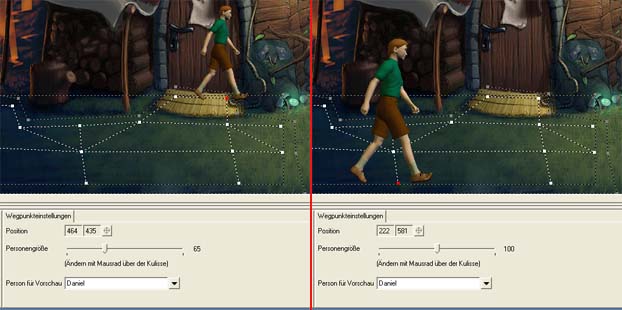
Here you should set and connect way-points, so that the character can reach all positions that are not directly accessible inside the way-borders (this is only possible if the polygon of the way-borders is non-convex). The way-points can also specify the size of the character on the scene.
IMPORTANT: If a character has been sent to position B from position A, it first tries to go there directly. If this is not possible (because the direct connection would cross the way-borders) the character first goes to the closest way-point which is directly accessible. Afterwards the character follows the connected way-points until it is possible to go to the destination position B directly from a way-point.
A new way-point can be created with a left click. The current way-point is shown in red. When a way-point is created it is automatically linked with the previous current way-point. To select a way-point just klick on it. With a right click a way-point can be deselected. To connect existing way-points you have to select one and click on the other one with the right mouse button. To delete an existing connection between way-points you have to select one of those way-points and click on the other one with the right mouse button. The current way-point can be deleted with the 'Del' key.
If a way-point is selected then the way-point settings will appear in the editor on the bottom. Here you can set the size of the character. If a preview-character is selected, than you can control the size of the character on the screen just by moving the cursor on the position of interest.
Create and edit polygonal areas
To create a border around a new object select the desired object in the list below. Thereafter use the left mouse button to create a new border. Every additional left click will add another point which will be linked to the previous one automatically. To close the polygon click on the first point again or click the right mouse button. The point highlighted in red is th current one. Use the del key on the keyboard to delete the current point. To move the point use the arrow keys or use the drag and drop method. To select a border press inside it if you aren't creating a polygon (it will be painted red). You can move the whole polygon by using the arrow keys or drag and drop. The 'del' key will delete the polygon. A right click will release the polygon from selection and the borders of all objects will be displayed again.
Create and edit actions
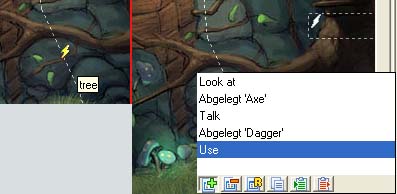
Next to each object appears a lightning. It is yellow if there exists at least one action, otherwise it's grey. Clicking on the lightning opens a window which contains a list of all actions of this object. You can edit an action by selecting it, which will display the action at the bottom. Pressing on the icon 'plus' adds a new (empty) action. For further details see Actions.
Place Graphics
All existing sprites of an object are listed and displayed with a grey edge. By clicking on an edge you can select a sprite. To move it keep the button pressed or use the arrow keys on the keyboard. The play button (yellow triangle) shows or hides a sprite. This makes it very easy for you to check if its position is set correctly.
Place Animation
All existing animations are listet and displayed with a grey edge. By clicking on an edge you can select them. To move it keep the button pressed or use the arrow keys on the keyboard. The play button (yellow triangle) will play the animation on the scene which conveys a good impression of how it will look like in the game. Clicking on the symbol below the play button shows a list which contains all animations of the object. To configure the position of an animation in the game select one from the list and place it on the desired position.
Objects
All objects belonging to this scene are listed here. You can assign an edge, one or more actions and animations, as well as an image to an object. For further details see objects
IMPORTANT: The order of the objects in this list defines the order in which these objects are drawn. The object at the bottom of the list is drawn first and the object at the top is drawn last. While drawing each object it will be tested if the person must be drawn because of the object centre - which indicates that the person is hidden by the object (see object centre at objects). If there are any problems with the order of drawn objects please control the order in this list and the object centre of each object.
Actions
All actions belonging to this scene are listed here. Actions to be started when entering the scene usually are here (if exist) as well as actions which don't belong to any object. For further details see actions
Conditions
All conditions belonging to this scene are listed here. For further details see conditions
Values
All values belonging to this scene are listed here. For further details see values


